Introduction
This tutorial will guide you on using the Tabaqat CSV Geocoder Tool to geocode CSV Files for Saudi Arabia Using Geocoding IDs of the Kingdom. We'll show you how to configure yaml files with the required parameters and how to run the tool to geocode CSV Files. Additionally, we'll demonstrate how to import and preview this data in GIS software like ArcGIS Pro for further analysis and visualization.
Technical Guide
To use the tool, You need to Sign in to tabaqat to get software key to install tabaqat GeoApps on your device by following steps of this Guide : https://tabaqat-wagtail.tabaqat.net/en/resources/blogs/step-by-step-guide-to-accessing-tabaqat-geoapps-unlocking-geospatial-tools-for-enhanced-analysis/
Configuring And Running The Tool To Geocode CSV Files
- Open command prompt to run the tool
- You can run the tool by two methods : Single file Geocoding or Multiple files Geocoding
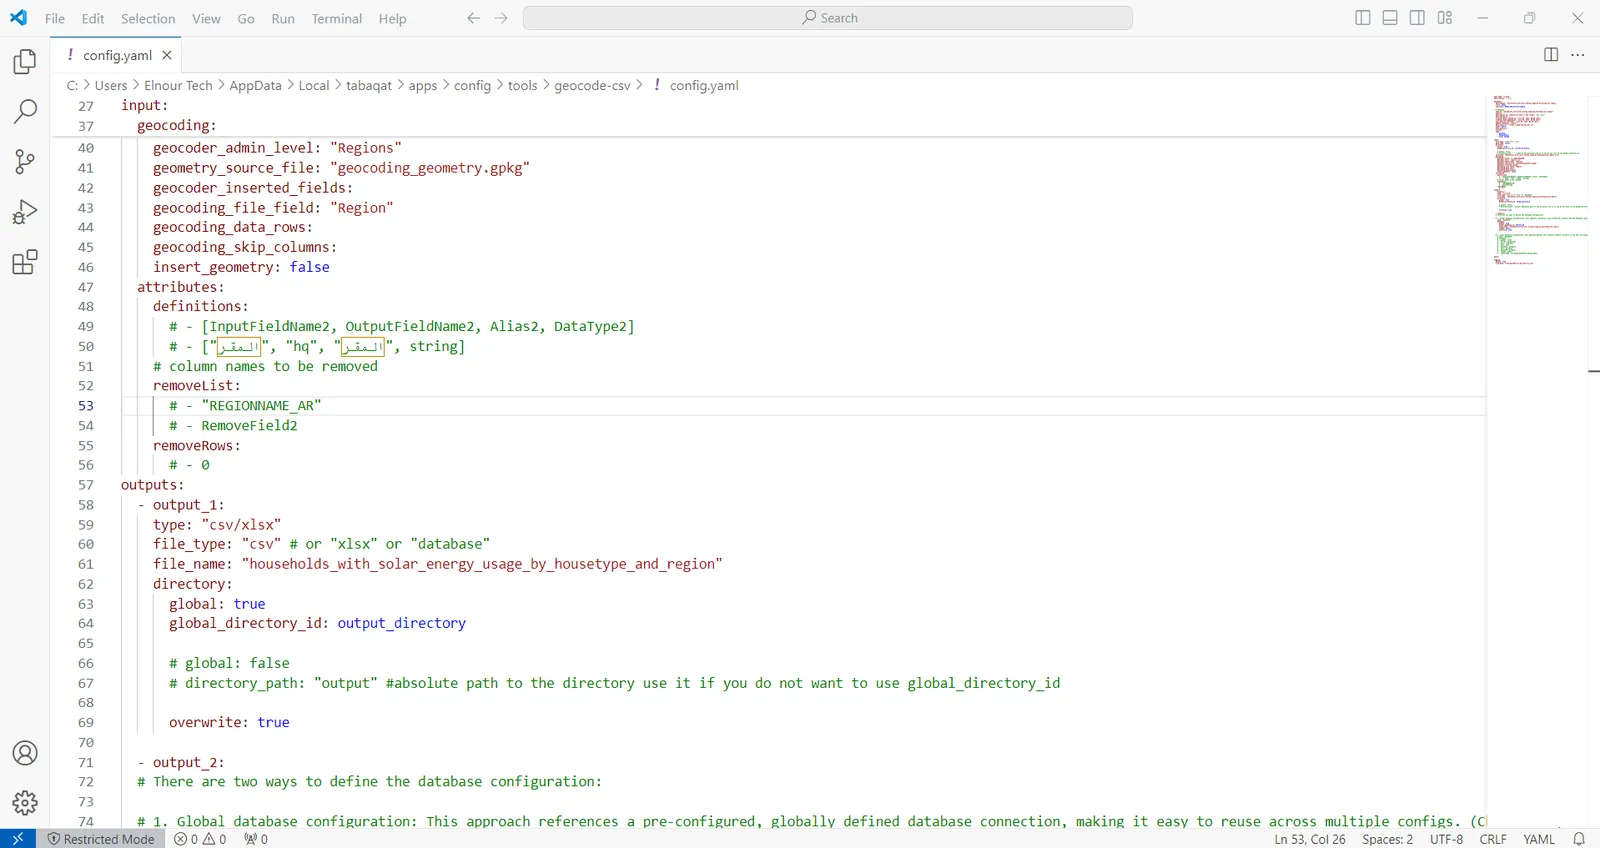
- Single file Geocoding : You can edit the parameters in config.yaml file to another CSV file from input folder which located under path : %\AppData\Local\tabaqat\apps\data\geocode-csv\ and all metadata of these files are located in tabular-samples.xlsx file under path : %\AppData\Local\tabaqat\apps\config\data_sources\ which should be edited in config.yaml file.
- Type tabaqat geocodecsv -getlayer in command prompt to run geocode csv tool which Provide geocoded (geometry) value column to csv/excel file.
- The tool will run on the default CSV file in config.yaml file which located under path : %\AppData\Local\tabaqat\apps\config\tools\geocode-csv\
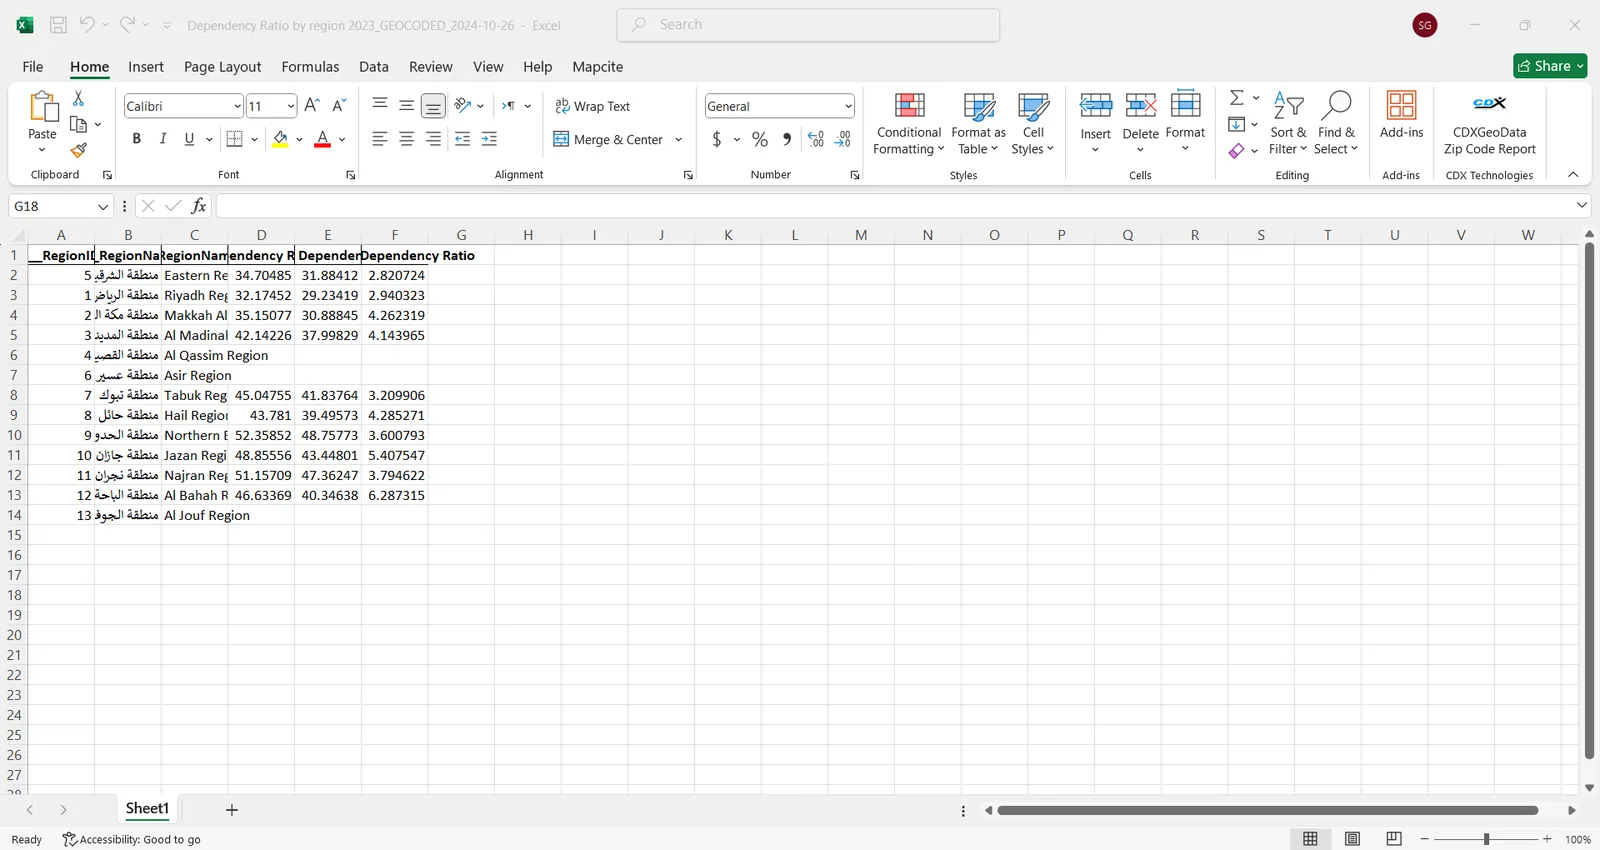
- The output of running the tool will indicates that the generation of geocoded CSV finished successfully and written to this path : C:\Users\UserName\AppData\Local\tabaqat\apps\data\geocode-csv\output-success\households_with_solar_energy_usage_by_housetype_and_region_GEOCODED_2024-10-26.xlsx.
- To open the output geocoded CSV, navigate to output-success folder which located under path %\AppData\Local\tabaqat\apps\data\geocode-csv\output-success\ Which will contain after running the tool the input CSV file and Output geocoded CSV file that end with : “_GEOCODED_date “ like : ” _GEOCODED_2024-10-26”

- Multiple files Geocoding : To run the tool on more than one CSV file, located in geocode-csv.xlsx which located in data sources of the installer, you can choose the data you want to run the tool on and change Generate Yaml Column status to TRUE to use Yaml generator tool to generate yaml files for these CSV files with input data and metadata existing in geocode-csv.xlsx.

- Type "tabaqat geocodecsv -config -generate" in the command prompt to generate Yaml files for all the CSV files you want to geocode.
- the output will indicate that all Yaml files are generated successfully and written to that path : %\AppData\Local\tabaqat\apps\config\tools\geocode-csv.
- To process generated Yaml files to geocode the target CSV files, Run this command "tabaqat geocodecsv -config -generate -all".
- The output of running the tool on multiple CSV files will indicate that the yaml files generated successfully and written to that path : C:\Users\UserName\AppData\Local\tabaqat\apps\config\tools\geocode-csv and and indicate that geocoded CSV files generated successfully and written to that path : %\AppData\Local\tabaqat\apps\data\geocode-csv\output-success\ and that some entries of CSV files couldn’t be matched.
- You can open the output geocoded CSV files to check if it’s geocoded successfully by navigating to output-success folder.
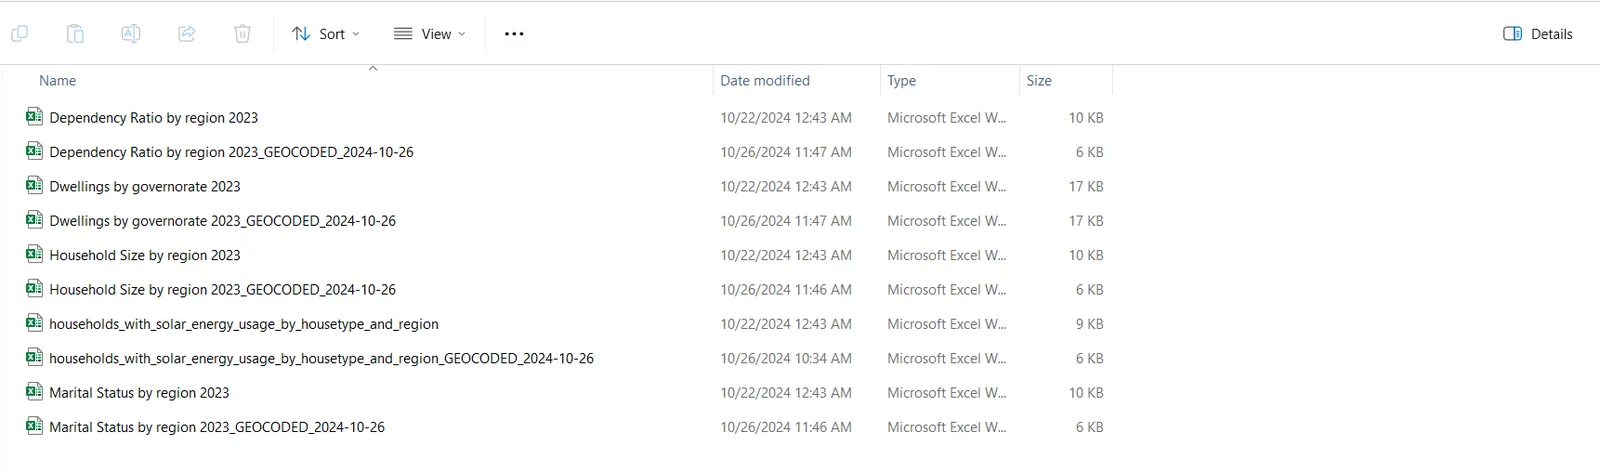
- Open one of the geocoded CSV files to check which regions matched and which couldn’t be matched by the tool.
Visualizing Output Geocoded CSV Files In ArcGIS Pro
- Join this geocoded data with the geometry file of KSA-Regions which contains the same Geocoding IDs of these regions in ArcGIS Pro.
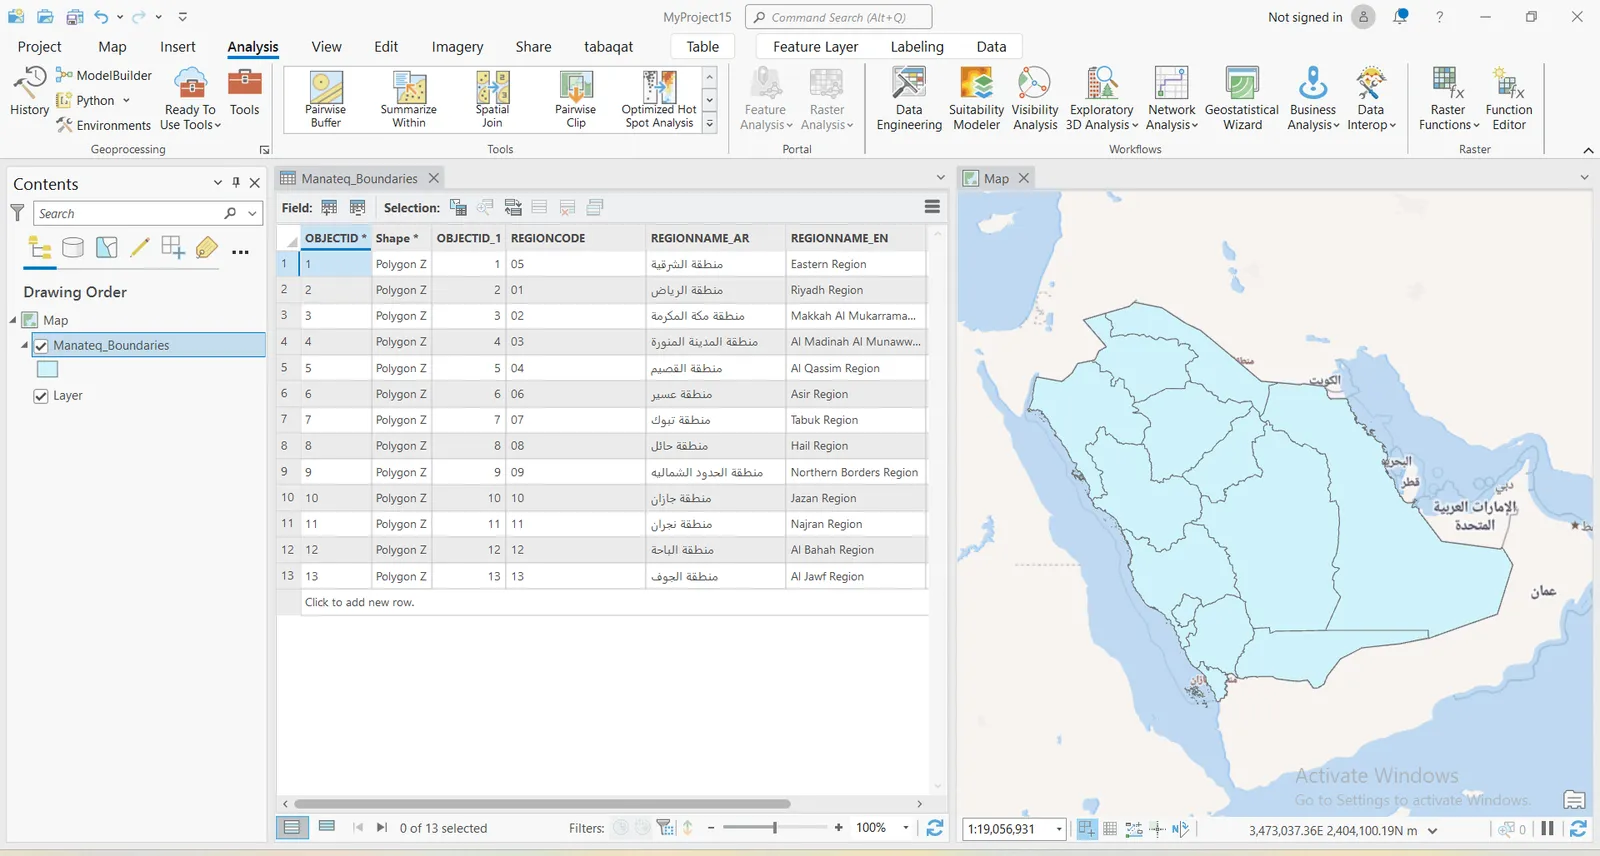
1. This is the geometry file that contain all Geocoding IDs of KSA Regions.
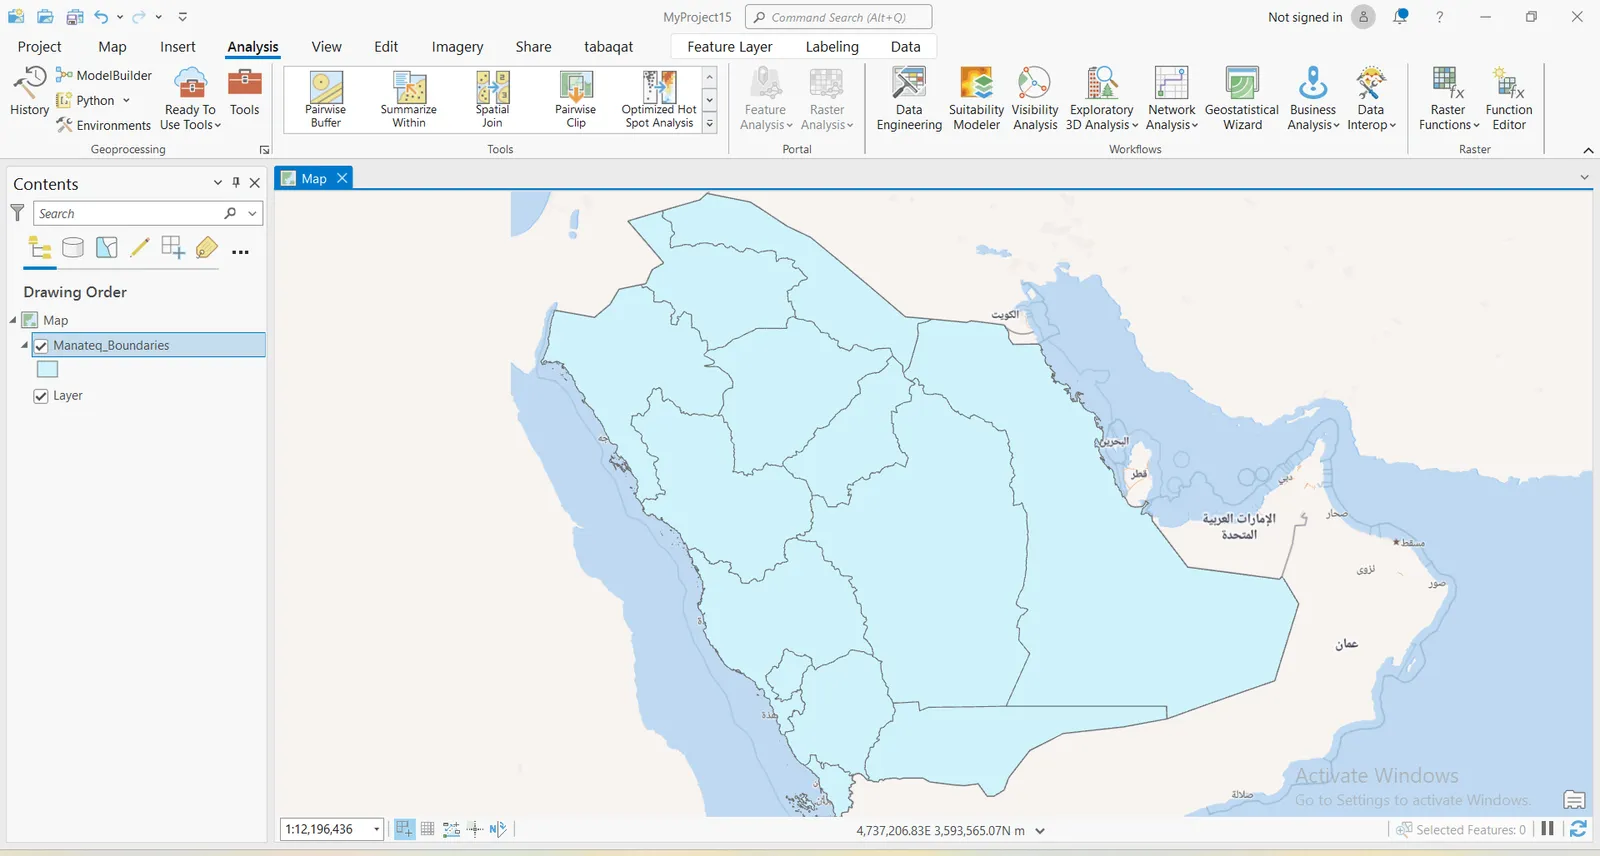
- Open attribute table to view the field that include geocoding IDs of the layer.
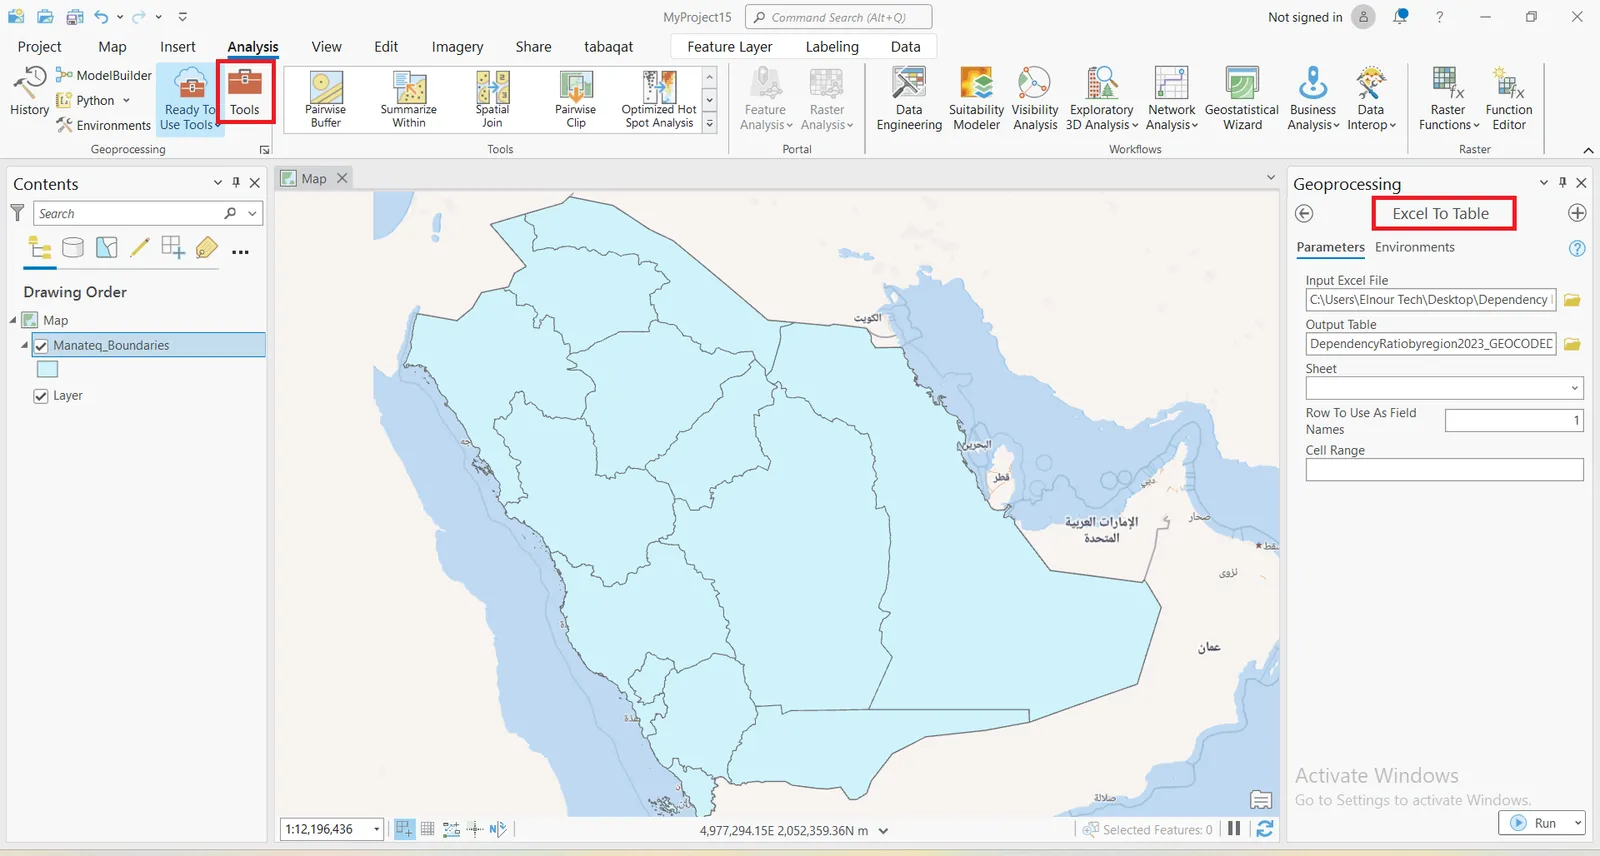
2. From Toolbox choose "Excel To Table", then run the tool to Add Geocoded Excel file to ArcGIS Pro.
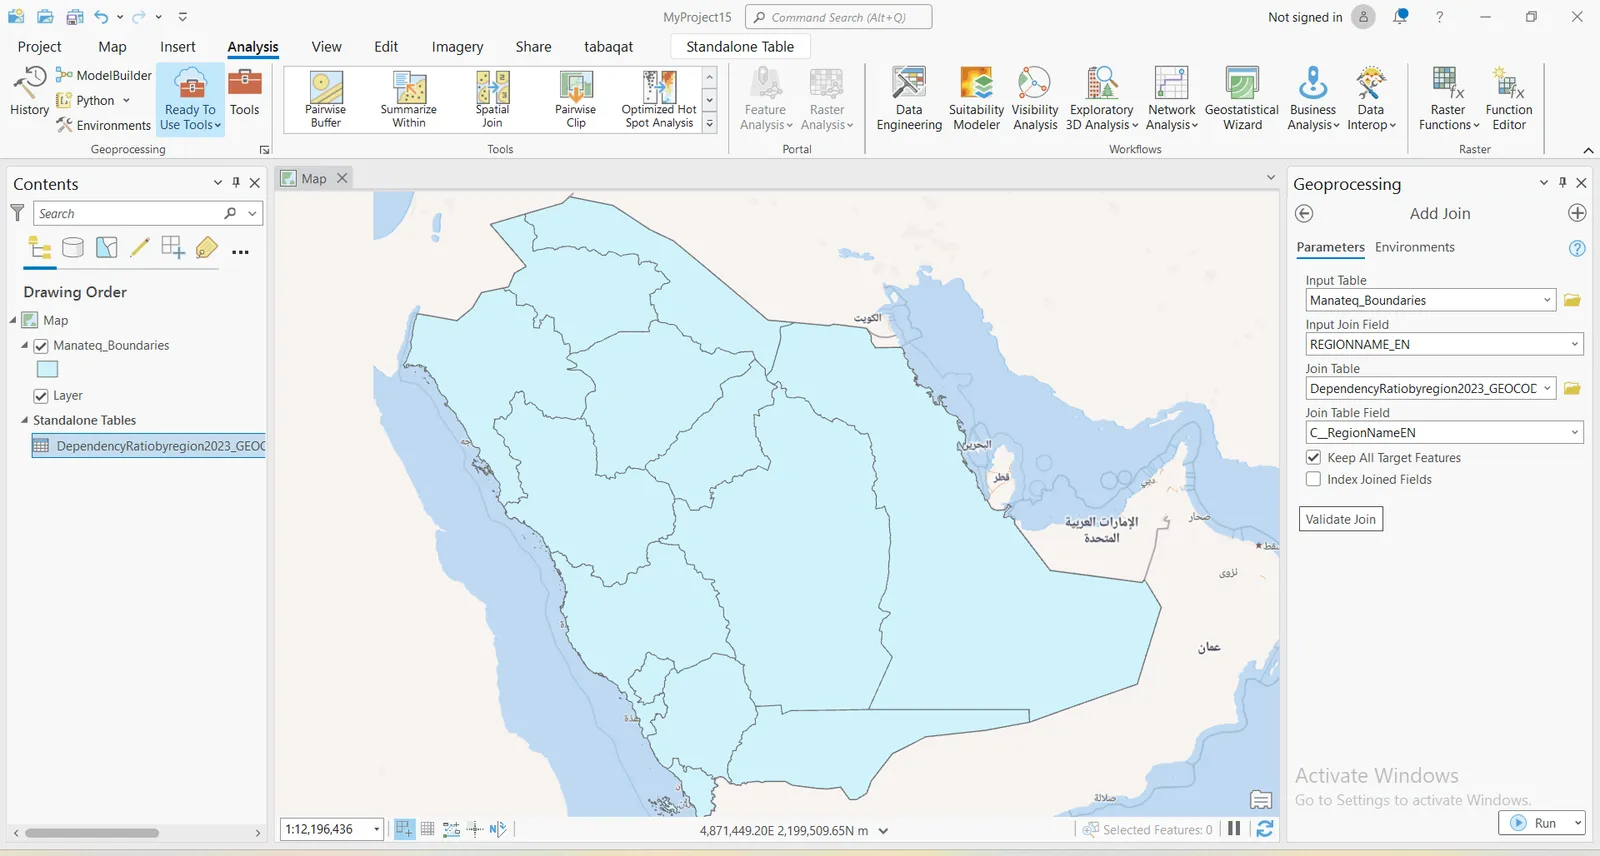
3. Choose "Add Join" from Toolbox to join geocoded excel file with the geometry file by Region ID , then run the tool.
4. After finishing Joining process, open the attribute table of geometry layer which called “Manateq-boundaries” to check the Join output of two layers.
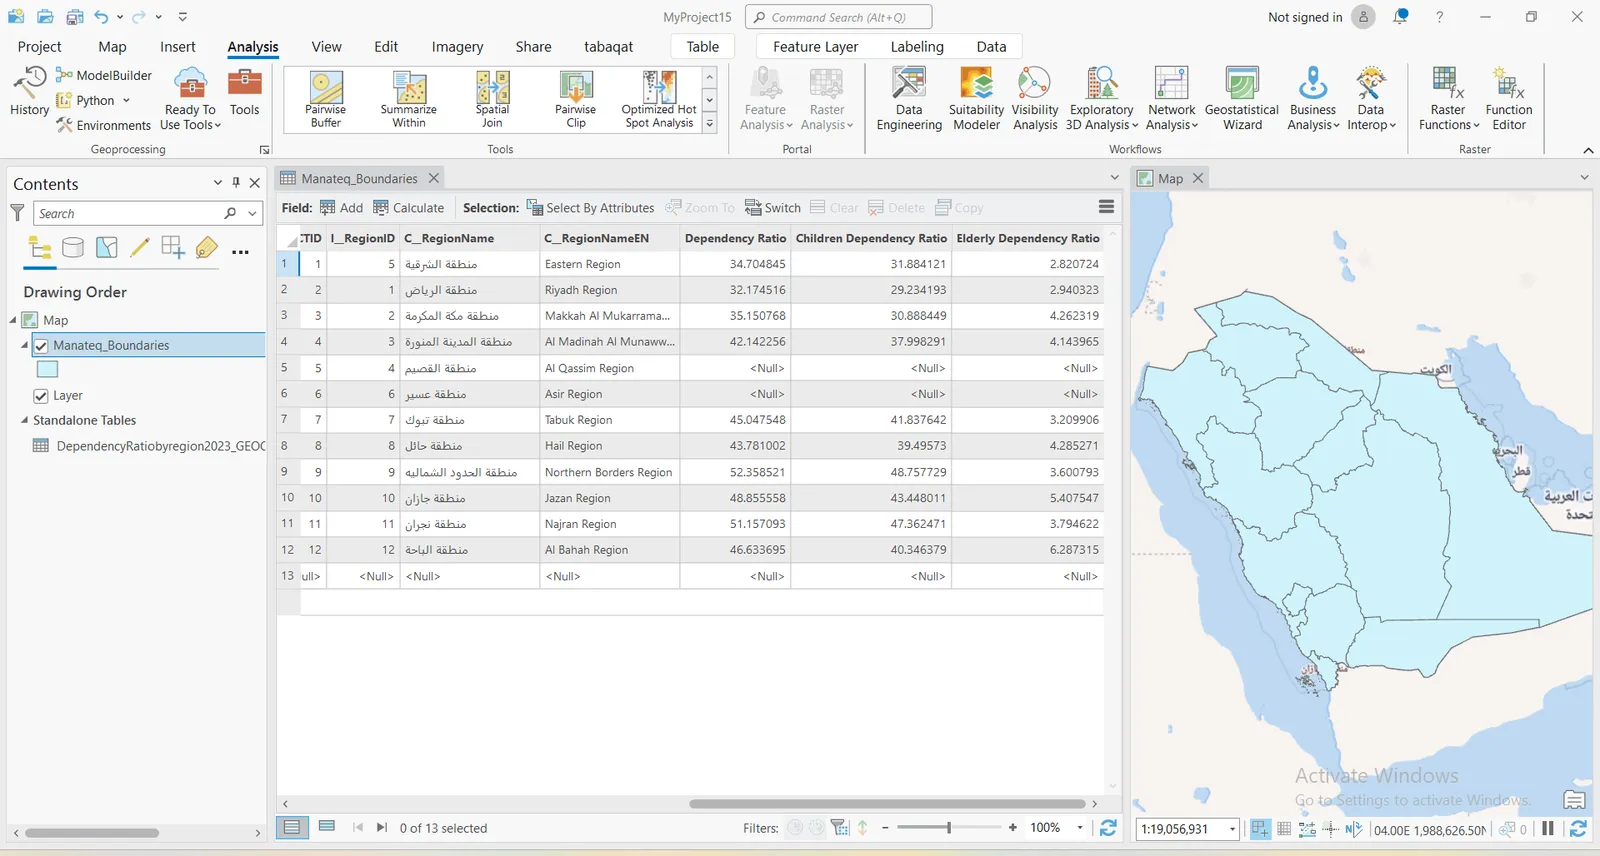
5. By following all the previous steps, you have viewed your geocoded CSV file on Map by joining it with the geometry layer.
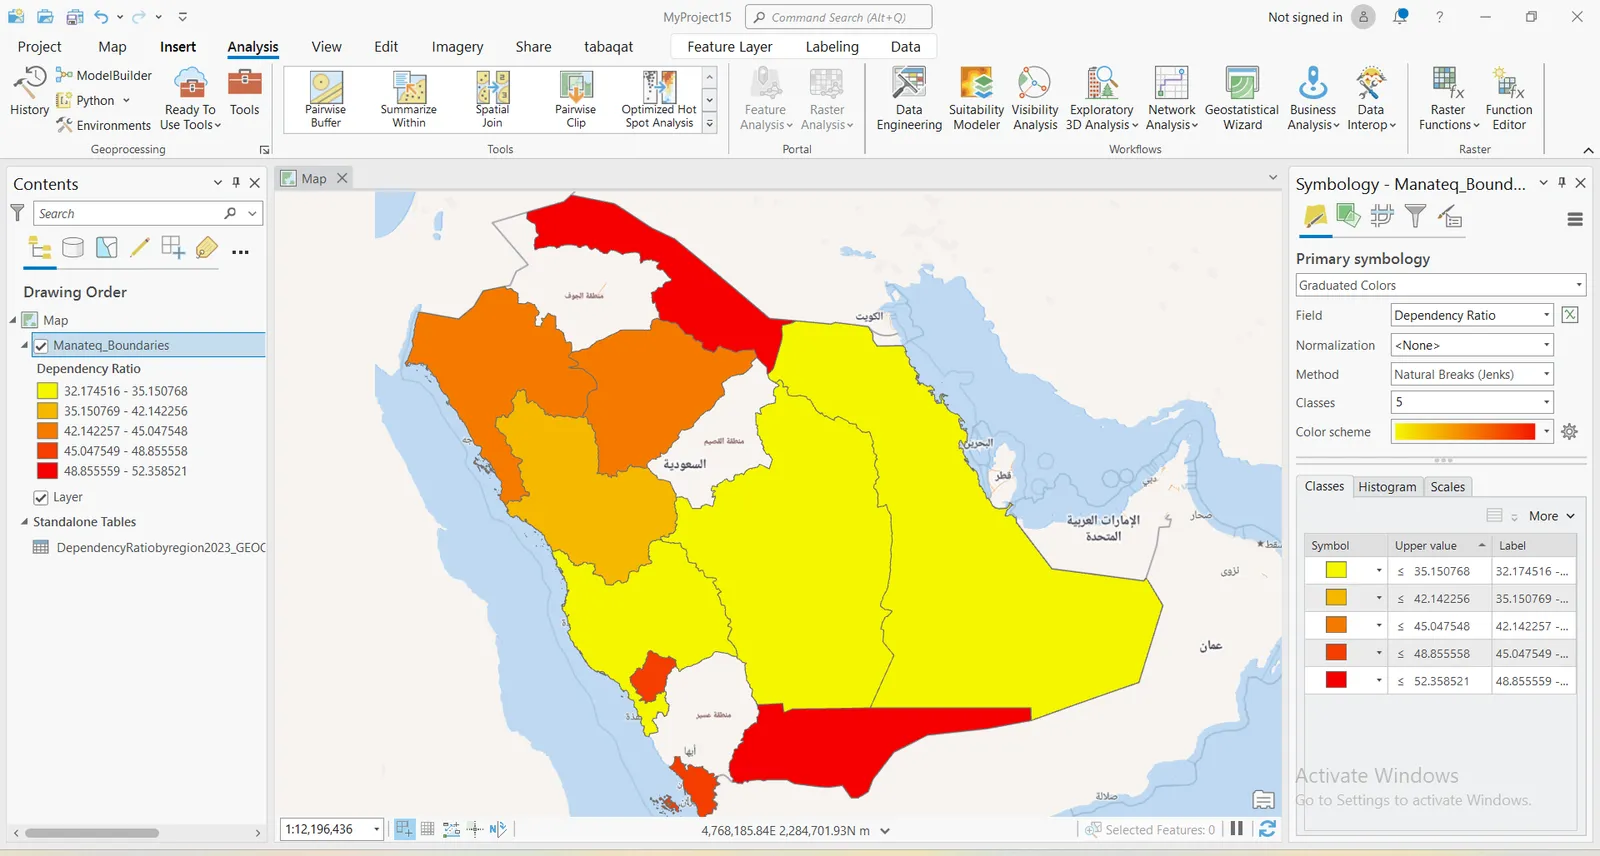
6. Also you can style the layer by a field values by following these steps.
7. Choose from properties window Symbology to style the layer, then choose Graduated Colors and choose the field name that contain the values you want to style the layer with.
8. Symbology will be applied to the layer according to the values of the field you chose to style the layer with.
Conclusion
By following all the previous steps, you have geocoded a CSV file, Joined it with a geometry file to view it on the map and styled it according to a column/field value.